Every photograph tells a story, but some stories resonate more powerfully. The secret often lies not in the camera you use, but in how you arrange the elements within your frame. This arrangement, known as photo composition, transforms a simple snapshot into a compelling visual narrative. Mastering composition allows you to guide your viewer’s eye, evoke emotion, and create images that truly stand out, preserving your precious memories with greater impact. This guide provides you with practical, actionable insights to improve your photographic eye, helping you understand how to compose better photographs for beginners and experienced enthusiasts alike. We will explore essential composition rules for stunning photos and turn your ordinary photos into extraordinary keepsakes.
Once you’ve captured your best shots, consider creating a home photo archive to ensure your digital files are preserved for generations.
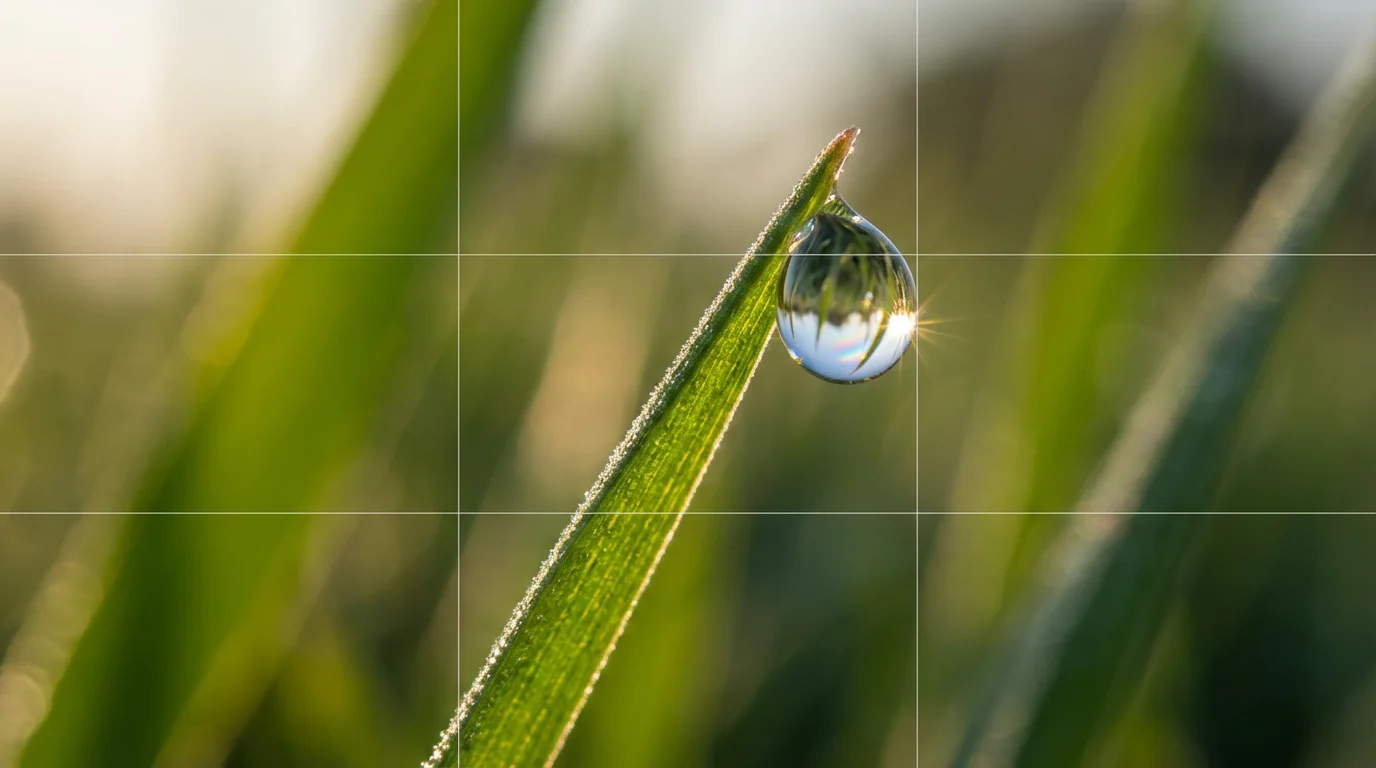
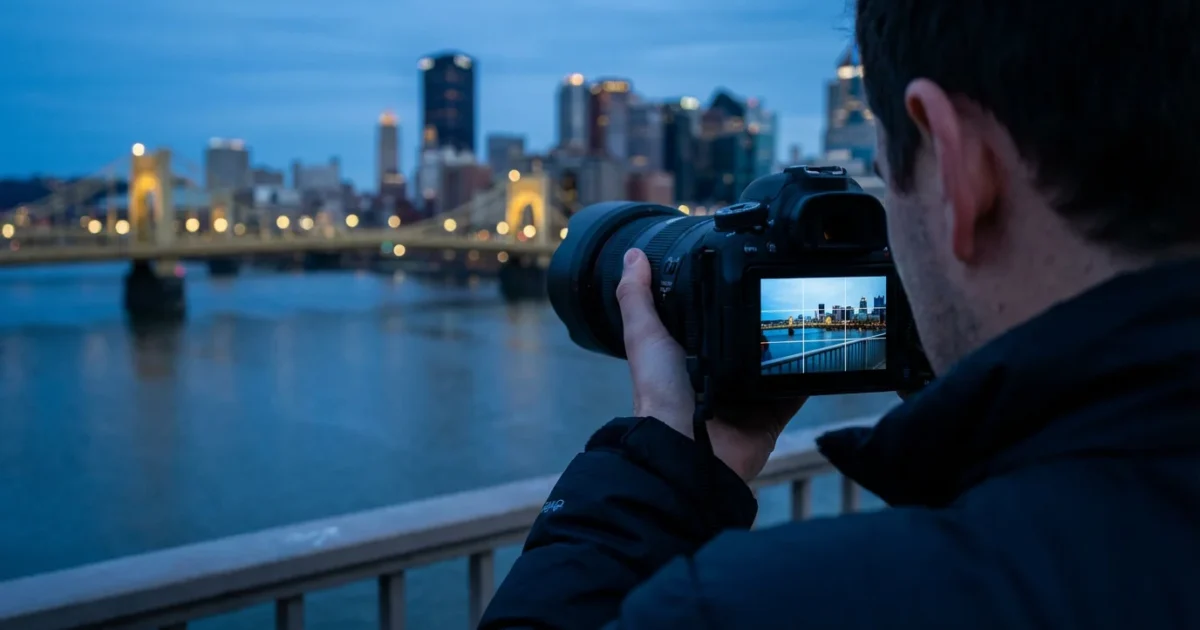
Understanding the Rule of Thirds
The rule of thirds stands as perhaps the most fundamental and widely recognized principle of photo composition. It provides a simple yet incredibly effective framework for arranging elements within your frame. Imagine dividing your image into nine equal sections by drawing two equally spaced horizontal lines and two equally spaced vertical lines across it. Most cameras, and even many smartphone apps, offer a grid overlay feature to help you visualize these lines.
This composition style is particularly helpful when learning how to take great group photos where everyone needs to be balanced in the shot.
If your original shot doesn’t perfectly follow these lines, you can easily refine your layout by cropping and straightening photos during the editing stage.
Instead of centering your subject, place key elements along these lines or, even better, at the points where they intersect. These intersection points, often called “power points,” naturally draw the viewer’s eye. For example, if you photograph a portrait, position your subject’s eyes along the top horizontal line. When capturing a landscape, align the horizon with either the top or bottom horizontal line, depending on whether you want to emphasize the sky or the foreground. This technique creates visual tension and dynamism, making your photograph more engaging than a centered, static shot.
Consider a portrait where the subject’s face is slightly off-center, aligning with one of the vertical lines. This leaves space in the frame, allowing the viewer’s gaze to wander or providing context to the environment. Similarly, a photograph of a boat on a lake looks more compelling if you place the boat at one of the lower-left or lower-right intersection points, rather than directly in the middle of the frame. This simple shift in placement immediately elevates the image.
The rule of thirds is not a rigid law, but a powerful guideline. It offers a starting point for more balanced and dynamic compositions, encouraging photographers to move beyond the habit of always placing subjects dead center.

Leading Lines Guide the Eye
Leading lines are powerful compositional tools that guide the viewer’s eye through your photograph, from one point to another. These lines can be obvious, like a road stretching into the distance, a fence line, or a river. They can also be more subtle, such as the edge of a building, a row of trees, or even the subtle texture patterns in sand or grass.
These directional elements are especially useful when applying smartphone photography tips for capturing family moments during your daily adventures.
When you incorporate leading lines, you create a sense of depth and perspective, drawing the viewer deeper into the scene. For maximum impact, leading lines often start in the foreground and extend towards a key subject or point of interest in the background. Imagine a photograph of a winding path through a forest. If the path begins near the bottom of your frame and snakes towards a sunlit clearing, it naturally pulls the eye through the entire image, creating an immersive experience.
Think about how bridges, railway tracks, or even the lines of a staircase can be used. These elements inherently possess linear qualities that you can leverage. Even people looking or pointing in a particular direction can create an implied leading line. By consciously looking for these natural or artificial lines in your environment, you gain a significant advantage in directing attention within your photographs. This technique is crucial for crafting strong composition rules for stunning photos.
Effective Framing Techniques
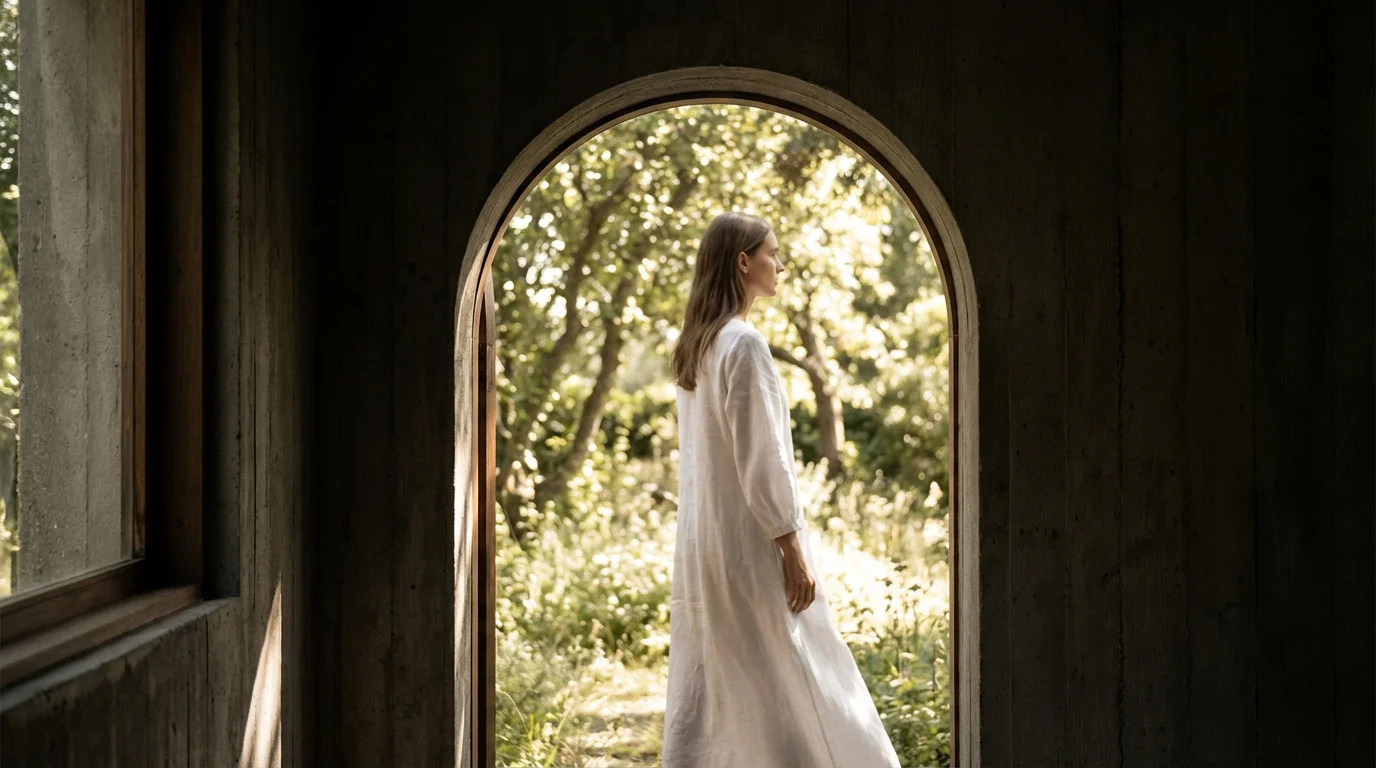
Framing techniques involve using elements within your scene to create a natural “frame” around your main subject. This technique isolates your subject, draws attention to it, and adds depth and context to the photograph. A natural frame can be anything from doorways, windows, arches, or tunnels to branches of trees, foliage, or even shadows.
If you are framing a subject through a window or doorway, understanding camera settings for better indoor photos can help you properly expose both the frame and the subject.
When you frame your subject, you provide a sense of enclosure and intimacy, making the viewer feel like they are peeking into a private moment or a carefully presented scene. For example, photographing a child playing in a park through an opening in a dense bush uses the foliage as a soft, natural frame. This not only highlights the child but also adds a touch of mystery and organic beauty to the image.
Consider a portrait shot through an open window, using the window frame itself to surround the subject. This not only emphasizes the person but also tells a story about their environment. You can even use human elements, like an arm or a shoulder, to frame another person. Experiment with both obvious and subtle frames. A darker foreground element framing a brighter background subject, for instance, can be incredibly effective in guiding the eye. This compositional choice adds layers of interest and visual richness to your photographs.

Mastering Negative Space
Often, photographers focus intently on their subject, forgetting the crucial role of what surrounds it. Negative space refers to the empty or uncluttered areas around and between the main subject of your photograph. Far from being “nothing,” negative space is a powerful compositional element that provides breathing room, emphasizes your subject, and simplifies your image for greater impact.
While negative space helps isolate your subject, you should also focus on how to take sharp photos every time to ensure your main focal point is perfectly crisp.
When you intentionally incorporate negative space, you prevent your photograph from appearing busy or chaotic. It allows the viewer’s eye to rest, focusing their attention squarely on the subject. Imagine a single bird silhouetted against a vast, clear sky. The sky represents the negative space, enhancing the drama and isolation of the bird. Without this surrounding emptiness, the bird might get lost in a cluttered background.
Consider a product photograph where the item sits on a plain, brightly lit surface. The simplicity of the background ensures the product stands out prominently. In portraiture, a blurry background (bokeh) effectively creates negative space, separating the subject from distractions. Learning to see and utilize negative space demonstrates an advanced understanding of photo composition, allowing you to create elegant, powerful images that communicate their message clearly. It is a vital aspect of how to compose better photographs for beginners.
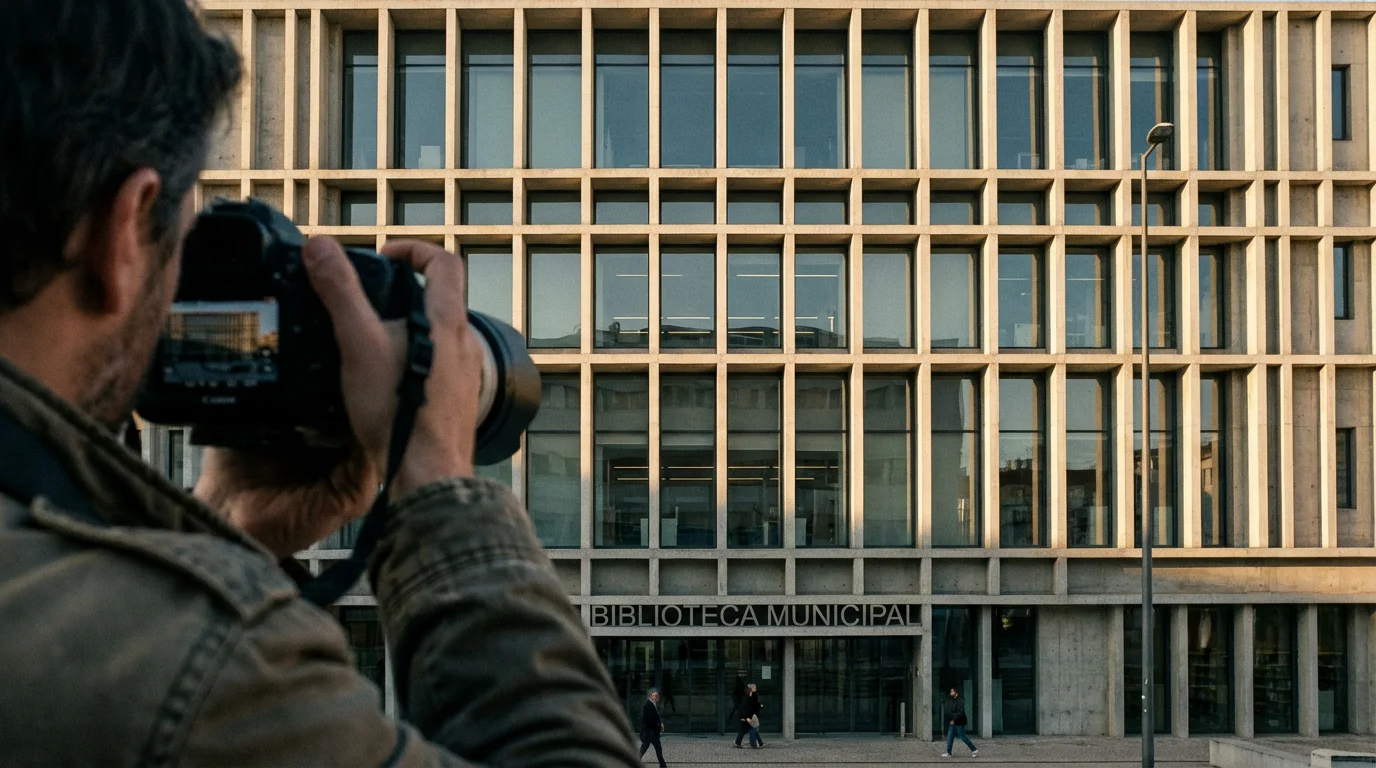
Discovering Symmetry and Patterns
Symmetry and patterns appeal to our innate desire for order and harmony. When effectively used in photo composition, they create visually striking and satisfying images. Symmetry occurs when elements on one side of an image mirror those on the other, either horizontally, vertically, or radially. Patterns involve the repetition of shapes, lines, colors, or textures.
Capturing these patterns makes for visually stunning prints, especially if you are looking for new photo wall ideas to decorate your home.
When a distracting element breaks an otherwise perfect visual rhythm, you can restore harmony by removing unwanted objects from photos using simple digital tools.
Reflections in water are classic examples of symmetrical compositions, where the landscape above the water perfectly mirrors its reflection below. Buildings with strong architectural lines often present opportunities for vertical or horizontal symmetry. Photographing a perfectly centered subject against a symmetrical background can create a sense of grandeur and stability. This technique demands precision to ensure the symmetry feels intentional and impactful.
Patterns, on the other hand, introduce rhythm and interest. Think of a field of sunflowers stretching to the horizon, the repetitive texture of cobblestones, or the geometric shapes in modern architecture. While patterns are often pleasing on their own, a photograph becomes even more compelling when you introduce a “break” in the pattern – something that stands out and disrupts the repetition. For instance, a single red apple in a basket of green apples immediately grabs attention. This interplay between order and disruption makes for truly memorable photographs.

Creating Balance Through Composition
Visual balance refers to the way elements in your photograph are arranged to achieve a sense of equilibrium. An unbalanced photo can feel jarring or incomplete, while a well-balanced one feels stable and harmonious. Balance does not always mean perfect symmetry; often, it involves what photographers call “asymmetrical balance” or “informal balance.”
With symmetrical balance, you mirror elements, creating a formal and often stately feel. Asymmetrical balance, however, uses elements of differing visual weight to achieve equilibrium. For example, a large, dominant subject on one side of the frame can be balanced by a smaller, but visually compelling, object or area of interest on the opposite side. The smaller element might have a brighter color, a unique texture, or occupy a power point on the rule of thirds grid, giving it enough visual weight to offset the larger subject.
Consider a portrait where the subject is off-center. You might balance the frame by including a distant tree or a unique cloud formation in the opposing corner. The key is to distribute visual weight so that no single part of the image feels too heavy or too light. Achieving balance requires a conscious assessment of every element’s size, color, brightness, and position, which makes it a sophisticated aspect of composition rules for stunning photos.

Building Depth in Your Photographs
Two-dimensional photographs inherently lack the three-dimensionality of the real world. However, skilled photographers use various techniques to create an illusion of depth, making images feel more immersive and real. This involves consciously arranging elements in the foreground, midground, and background.
A strong foreground element immediately draws the viewer into the scene. For instance, a flower or a rock placed in the very front of a landscape photograph acts as an anchor. The midground typically contains your main subject or the core of your narrative. The background then provides context, scale, or simply a pleasing backdrop, often rendered slightly out of focus to emphasize the midground subject.
Using leading lines (as discussed earlier) also contributes significantly to depth. Overlapping elements, where one object partially obscures another, provide clear visual cues about their relative positions in space. Atmospheric perspective, where distant objects appear lighter, less saturated, and hazier due to atmospheric conditions, also enhances the sense of distance. By consciously layering your scene from front to back, you create a rich, three-dimensional experience for the viewer, making your photographs more captivating and helping you how to compose better photographs for beginners.

Simplifying for Impact: The Principle of Exclusion
One of the most powerful compositional techniques involves actively deciding what to leave out of your frame. The principle of exclusion, often summarized as “less is more,” focuses on removing distractions and extraneous elements that detract from your main subject. A cluttered photograph overwhelms the viewer, making it difficult to discern the intended focal point.
By excluding distractions, you make the task of decluttering your photo collection easier by focusing only on your highest-quality images.
Before pressing the shutter, take a moment to scan the entire frame. Are there distracting bright spots, unwanted objects in the background, or competing elements that pull attention away from your subject? Often, a slight change in your shooting position, a step to the left or right, or a different angle can eliminate these distractions. Sometimes, zooming in or using a wider aperture to blur the background (creating more negative space) helps simplify the image.
This approach requires discipline. It means actively asking yourself, “What is the essential message of this photograph, and what elements truly support it?” By ruthlessly excluding anything that doesn’t add value, you strengthen your composition and ensure your subject commands full attention. This principle is vital for making your photos truly stand out, turning ordinary scenes into powerful statements.

Exploring Point of View and Angle
Your point of view, or the perspective from which you photograph, dramatically influences the story your image tells and its emotional impact. Most people photograph from eye level, which is natural but often results in predictable, uninspired images. By consciously altering your point of view and angle, you unlock new compositional possibilities.
To capture these unique angles safely, it helps to have essential camera accessories like a flexible tripod or a remote shutter.
Try getting low to the ground to photograph children or pets, placing the viewer directly in their world. This low angle often makes subjects appear more imposing or creates an intimate connection. Conversely, shooting from a high angle, looking down on a scene, can provide a sense of scale, patterns, or vulnerability. Imagine photographing a bustling market from a balcony above, capturing the geometric patterns of the stalls and the flow of people, or a child’s toy from their eye level, lending it significant importance.
Even small shifts in angle can make a difference. Tilting your camera slightly can introduce dynamic diagonal lines. Experiment with different positions – crouching, climbing, leaning – to discover unique perspectives that transform ordinary subjects into extraordinary photographic opportunities. This active exploration of perspective is a hallmark of skilled photographers, moving beyond basic composition rules for stunning photos and into artistic expression.

Practicing Composition Daily
Understanding these composition techniques marks the first step; consistent practice ensures mastery. The great photographers developed their keen eye through countless hours of observation and experimentation. You can do the same. Make a conscious effort to apply one new compositional technique each time you take photographs, whether with your smartphone or a dedicated camera.
While you practice, remember that basic photo editing can further enhance the composition by adjusting the exposure and focus of your shots.
As you practice, having the right essential camera accessories every photographer needs will ensure you are prepared for any compositional challenge.
Start by focusing on the rule of thirds in every shot for a week. Then, dedicate the next week to actively seeking out and utilizing leading lines. Challenge yourself to find natural frames in your everyday environment. Review your photographs critically, not just for technical flaws like focus or exposure, but specifically for how well you applied compositional principles. What would happen if you shifted your angle slightly? Could you have used negative space more effectively?
Photography is a journey of continuous learning. Your “photographic eye” develops with consistent effort and mindful practice. The more you analyze scenes for compositional opportunities, the more instinctively you will apply these techniques, transforming your images into captivating visual stories that truly reflect your memories and experiences. For further learning on advanced photography concepts, consider exploring resources like Cambridge in Colour, which offers detailed tutorials on various photographic principles.
Frequently Asked Questions
What is the most important composition rule?
While no single rule reigns supreme, the rule of thirds is widely considered the most fundamental and impactful for beginners. It offers an excellent starting point for creating balanced and engaging photographs, breaking the habit of always centering your subject. Mastering it provides a strong foundation for exploring more advanced techniques.
Can I break composition rules?
Absolutely. Composition rules are guidelines, not unbreakable laws. Once you understand them thoroughly, you gain the artistic freedom to intentionally break them for creative effect. For example, centering a subject can create a powerful, symmetrical statement, or a deliberately unbalanced frame might evoke tension. Break rules only when you know why you are doing it and what effect you aim to achieve.
How do I make my subjects stand out more?
Several composition techniques help your subjects stand out. Use the rule of thirds to place your subject off-center at a power point. Employ framing techniques to draw attention to them. Critically, utilize negative space around your subject to eliminate distractions and provide visual breathing room. A shallow depth of field (blurry background) also isolates the subject effectively.
What are the benefits of using leading lines?
Leading lines are incredibly beneficial because they guide the viewer’s eye through the photograph, creating a sense of movement and depth. They can direct attention towards your main subject, add a dynamic quality to the image, and enhance the overall narrative by creating a visual journey within the frame.
How can I practice composition without a fancy camera?
You can practice composition with any camera, including your smartphone. The principles of the rule of thirds, leading lines, framing, and negative space apply universally. Use your phone’s grid overlay to practice the rule of thirds. Look for patterns, symmetry, and opportunities for unique angles in your everyday environment. The goal is to train your eye, not to rely on expensive equipment.
Disclaimer: This article is for informational purposes only. When handling valuable or irreplaceable photographs, consider consulting a professional conservator. Always test preservation methods on non-valuable items first.


Leave a Reply