
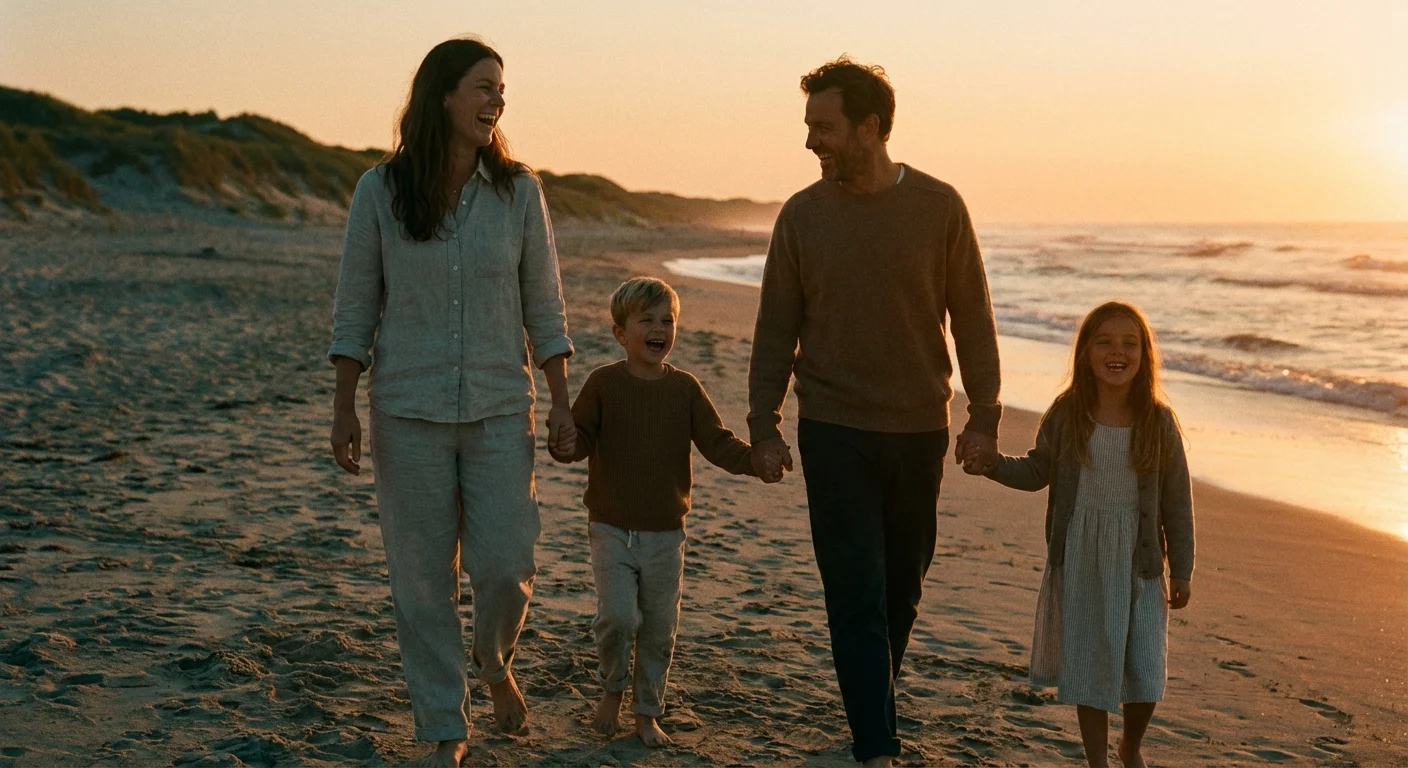
You spent months planning the perfect beach vacation or an elegant outdoor wedding, only for the weather to refuse to cooperate. Instead of the vibrant sunset or the crisp blue sky you envisioned, your photographs feature a flat, featureless expanse of gray. While these photos capture the people and the moments that matter, the dull atmosphere often fails to convey the joy you felt at the time. You do not have to settle for these gloomy results; modern technology offers a powerful solution to breathe life back into your memories.
Sky replacement allows you to swap a distracting or boring sky for one that complements your subject. This technique has evolved from a complex chore reserved for professional graphic designers into a straightforward process that anyone can master at home. By following a few practical steps, you can transform a washed-out wedding portrait into a stunning keepsakes or turn a rainy city excursion into a dramatic architectural study. This guide provides a comprehensive sky replacement tutorial to help you rescue your most precious images.
The Emotional Impact of Environmental Lighting
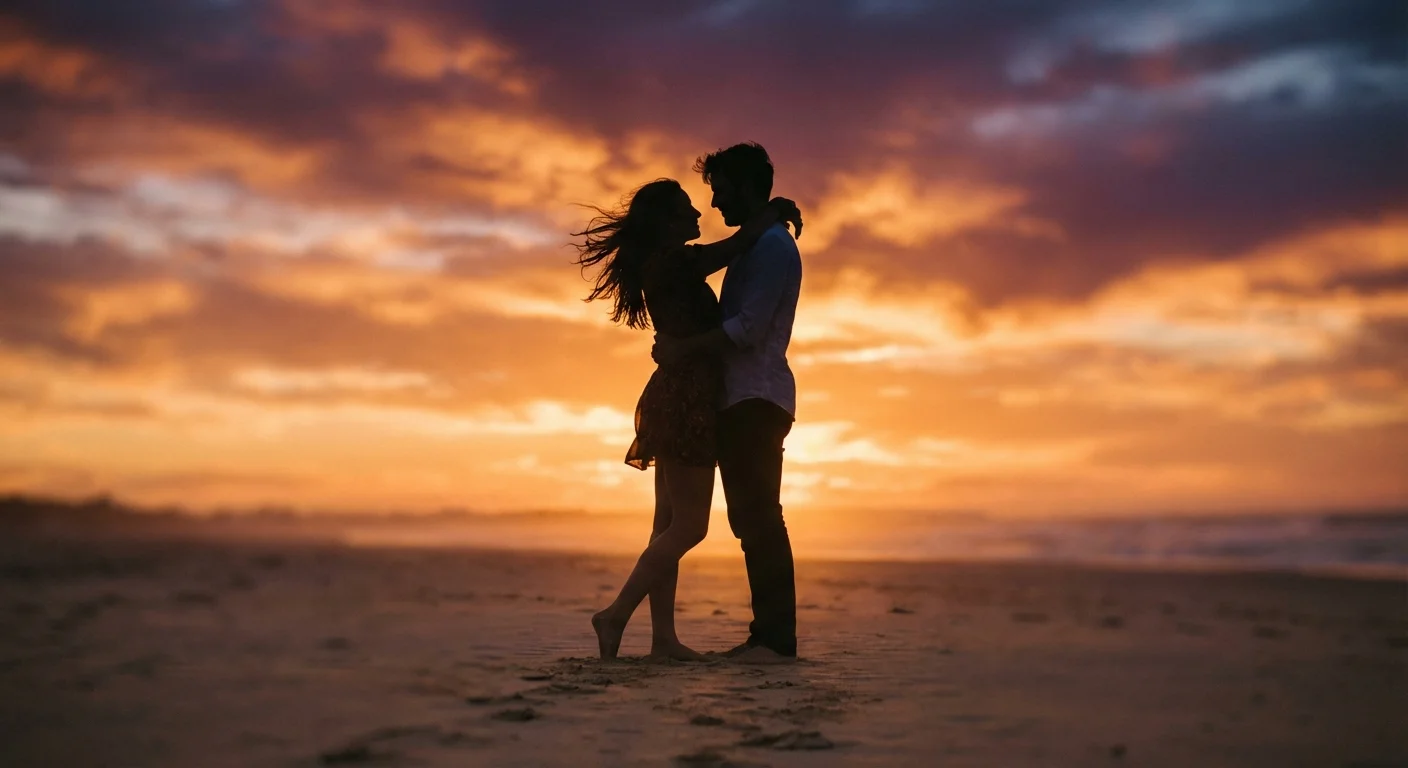
Photography is more than a simple record of a scene; it is a medium for capturing the mood and atmosphere of a specific moment. The sky acts as the largest light source in any outdoor photograph, dictating the color temperature, shadow density, and overall “feel” of the image. When you look back at your wedding photos or vacation snapshots, the lighting often triggers the same emotions you felt that day. A bright, sunny sky evokes energy and happiness, while a golden hour glow suggests romance and nostalgia.
Unfortunately, a “white-out” sky—where the camera fails to capture any detail in the clouds—creates a visual vacuum. It draws the eye away from your family members and toward the brightest, least interesting part of the frame. This lack of contrast often makes the entire image look muddy or underexposed. By learning how to fix dull sky in photos, you are not just “faking” the weather; you are directing the viewer’s focus back to the true subjects of the image—your loved ones and the beautiful locations you visited.
Consider the difference in a wedding album where every outdoor shot looks overcast and cold. By subtly enhancing the sky, you bring warmth back to the skin tones and ensure the couple stands out against the background. Data from professional photo labs suggests that images with balanced contrast and vibrant colors are significantly more likely to be printed and displayed than those with flat, gray tones. Taking the time to edit these photos ensures they live on your walls rather than remaining hidden in a digital folder.

Choosing the Right Tools for Your Skill Level
The market for photo editing software has expanded rapidly, offering options for every budget and technical ability. You no longer need to spend years learning the intricacies of manual masking to achieve professional-grade results. To decide which tool fits your needs, evaluate how many photos you need to process and how much control you want over the final look.
| Software | Best For | Key Feature |
|---|---|---|
| Luminar Neo | Beginners & Hobbyists | One-click AI Sky Replacement |
| Adobe Photoshop | Advanced Editors | Detailed manual masking and layering |
| Adobe Lightroom | High-volume Editing | Subtle sky masking and color grading |
| Mobile Apps (Snapseed/Lightleap) | Quick Social Sharing | Fast, automated sky filters |
If you have thousands of photos from a two-week European vacation, luminar sky replacement is often the most efficient choice. The software uses artificial intelligence to identify the horizon line and detect objects like thin tree branches or power lines that overlap the sky. It then masks these objects automatically, saving you hours of tedious work. For those who enjoy a deeper level of customization, Digital Photography Review provides extensive benchmarks on how different software packages handle high-resolution files and complex textures.
For more experienced users, Adobe Photoshop remains the industry standard. It offers a “Sky Replacement” tool under the Edit menu that functions similarly to Luminar but allows for more granular adjustments. If you are working with precious family heirlooms that have been digitized, having this level of control ensures that you can match the grain and sharpness of the original film to the new digital sky.

A Practical Sky Replacement Tutorial
Regardless of the software you choose, the fundamental workflow for replacing a sky remains consistent. Follow these steps to ensure a natural transition between your original foreground and your new background. We will use a general AI-assisted workflow as the basis for this tutorial, as it is the most accessible method for most readers.
- Select Your Base Photo: Choose an image where the sky is the weakest element. Photos with a clear horizon line are the easiest to start with. If you are working with a wedding photo where the sky is completely “blown out” (pure white), you have a blank canvas to work on.
- Analyze the Original Light: Look at the shadows in your photo. If the sun was coming from the right, your new sky must also have the sun (or the brightest light) on the right. Matching the direction of light is the single most important factor in a believable edit.
- Apply the Sky Replacement: In your chosen software, open the sky replacement tool. Browse through the available sky presets. Most software offers categories like “Blue Sky,” “Sunset,” or “Dramatic.”
- Adjust the Horizon and Shift: Once the new sky appears, use the “Horizon Position” or “Shift Edge” sliders. You want the new sky to sit perfectly at the boundary where the land or sea meets the air. If there are mountains or buildings, ensure the sky tucks behind them without leaving a glowing white halo.
- Match the Temperature and Exposure: If your original photo was taken on a cold, winter day, a tropical sunset sky will look out of place. Use the “Sky Temperature” and “Sky Exposure” sliders to blend the new elements with the original scene.
“The best sky replacement is the one that no one notices. Your goal isn’t to create a postcard; it’s to recreate the feeling of the day as you remember it.”
If you find that the edges look “crunchy” or artificial, look for a “Fade Edge” or “Refine Mask” setting. This softly blurs the transition between the sky and the trees or buildings, mimicking the natural haze found in the atmosphere. Remember that the sky is rarely as sharp as the objects in the foreground, so a slight blur on the sky layer often increases the realism of the shot.
The Secret to Realism: Matching Light and Color
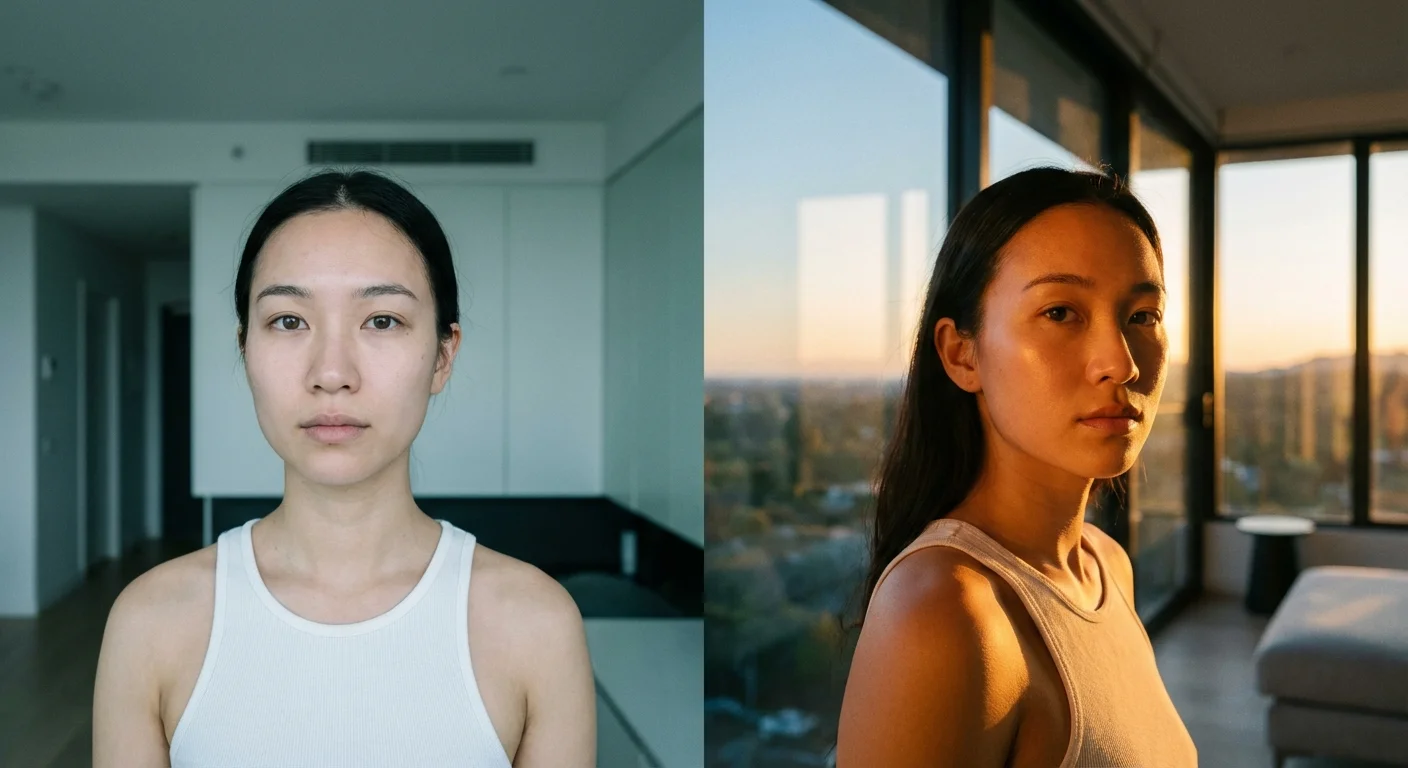
The most common mistake beginners make is ignoring the “Relighting” phase. When the sky changes, the light hitting the ground should change too. If you place a fiery red sunset into a photo that was originally shot under a flat gray sky, the buildings and people will still have that flat gray light on them, which looks jarringly artificial.
To fix this, use the “Relight Scene” or “Relight Strength” feature found in tools like Luminar Neo. This AI-driven feature analyzes the colors in your new sky and casts those same colors onto your foreground. For example, if you choose a sky with golden hues, the software will add a warm glow to the tops of trees and the shoulders of your subjects. This creates a cohesive look that suggests the entire scene was captured under those conditions.
Understanding the physics of light can significantly help your editing process. Cambridge in Colour offers excellent resources on color temperature and how light interacts with different surfaces. When you understand that a blue sky reflects blue light into the shadows, you can manually adjust your shadow tints to match your new sky. This attention to detail separates a casual edit from a professional preservation effort.
Check the reflections in your image as well. If your vacation photo features a lake, a puddle, or even the glass windows of a skyscraper, those surfaces should reflect the new sky. Advanced sky replacement tools often include a “Reflection” slider. If yours does not, you may need to manually duplicate the sky, flip it vertically, and lower the opacity over the reflective surfaces to create a believable effect.

Refining Complex Edges and Reflections
Not every photo has a straight horizon. You will often encounter “difficult” subjects like a bride’s fine lace veil, a grove of pine trees, or a complex city skyline. These are the areas where automated tools often struggle, leaving “halos” of the original gray sky trapped between the branches or threads.
To handle these areas, use a “Mask Refinement” brush. This tool allows you to tell the software which areas are “Global” (mostly sky), which are “Object” (mostly foreground), and which are “Transition” (the messy bits in between). By brushing over the transition areas, you allow the AI to recalculate the blend, often eliminating those pesky white outlines. If you are working on a wedding photo, pay special attention to the hair. Gray sky peeking through dark hair is a dead giveaway of an edit; use a “De-fringe” tool or a “Color Recovery” brush to soak the new sky colors into those gaps.
Another trick for realism is to consider the “Atmospheric Haze.” In nature, objects further away appear lighter and bluer because there is more air between the viewer and the object. When you replace a sky, you can often add a bit of “Fog” or “Haze” near the horizon. This softens the transition and makes the depth of field feel more natural. It also helps hide any minor imperfections in the masking along the horizon line.

Ethical Editing and Preservation Best Practices
When you are working with family history and memories, a question of ethics often arises: is it “wrong” to change the sky of a historical event? For professional photojournalism, the answer is usually yes. However, for personal and family photography, the goal is often different. You are capturing the spirit of an event. If a gray sky makes a wedding look somber when the day was actually full of joy, changing the sky is a form of “emotional restoration.”
However, preservation should always be your priority. Follow these rules to ensure your memories remain safe even as you experiment with editing:
- Never overwrite your original file: Always work on a copy. Keep your original RAW or high-resolution JPEG files in a separate “Master” folder. These are your digital negatives.
- Use Non-Destructive Editing: Use software that saves your changes in a sidecar file or a catalog (like Lightroom or Luminar) rather than baking the changes into the pixels immediately.
- Save in High Quality: When you export your “saved” photo, use a high-quality format like TIFF or a high-bitrate JPEG. This ensures that if you want to print the photo later, it has enough data for a large-format print.
- Document Your Changes: If you are adding an edited photo to a family archive, consider adding a small note in the metadata or a physical note on the back of the print stating that the sky was enhanced. This helps future generations understand what is a literal record and what is an artistic interpretation.
The goal of using sky replacement is to enhance the story you are telling. Whether it is the story of your wedding day or a grand adventure across the globe, the environment should support your narrative, not distract from it. By mastering these tools, you take control of your photographic heritage, ensuring that your memories are as vibrant and beautiful as the moments they represent.
Frequently Asked Questions
Does sky replacement make my photos look fake or over-edited?
Sky replacement only looks fake if the lighting on the ground does not match the new sky. Modern tools like Luminar and Photoshop include “Relight” features that automatically adjust the colors and shadows of your foreground to match the new sky, creating a seamless and realistic result.
What is the best software for beginners to fix a dull sky in photos?
For most individuals who want quick, high-quality results without a steep learning curve, Luminar Neo is the top choice. Its AI-driven sky replacement tool handles complex masking around trees and buildings automatically, making it much easier than manual editing in traditional software.
Can I use sky replacement on old, scanned family photographs?
Yes, you can apply these techniques to digitized versions of old film photos. However, you should ensure the replacement sky has a similar grain and texture to the original photo so the edit doesn’t look out of place. Always keep your original scan untouched and work on a copy.
Do I need to be a professional photographer to use these tools?
Not at all. Current AI-powered photo editors are designed for hobbyists and families. The software does the heavy lifting of identifying the horizon and masking out subjects, allowing you to focus on the creative choice of which sky looks best for your memory.
Disclaimer: This article is for informational purposes only. When handling valuable or irreplaceable photographs, consider consulting a professional conservator. Always test preservation methods on non-valuable items first.


Leave a Reply