You can decipher an eroded, illegible nineteenth-century marble headstone standing under dense forest canopy in under five minutes without touching the fragile stone.
Amateur researchers often resort to harmful chalk or shaving cream, but direct physical contact accelerates granular disintegration on weathered calcite surfaces.
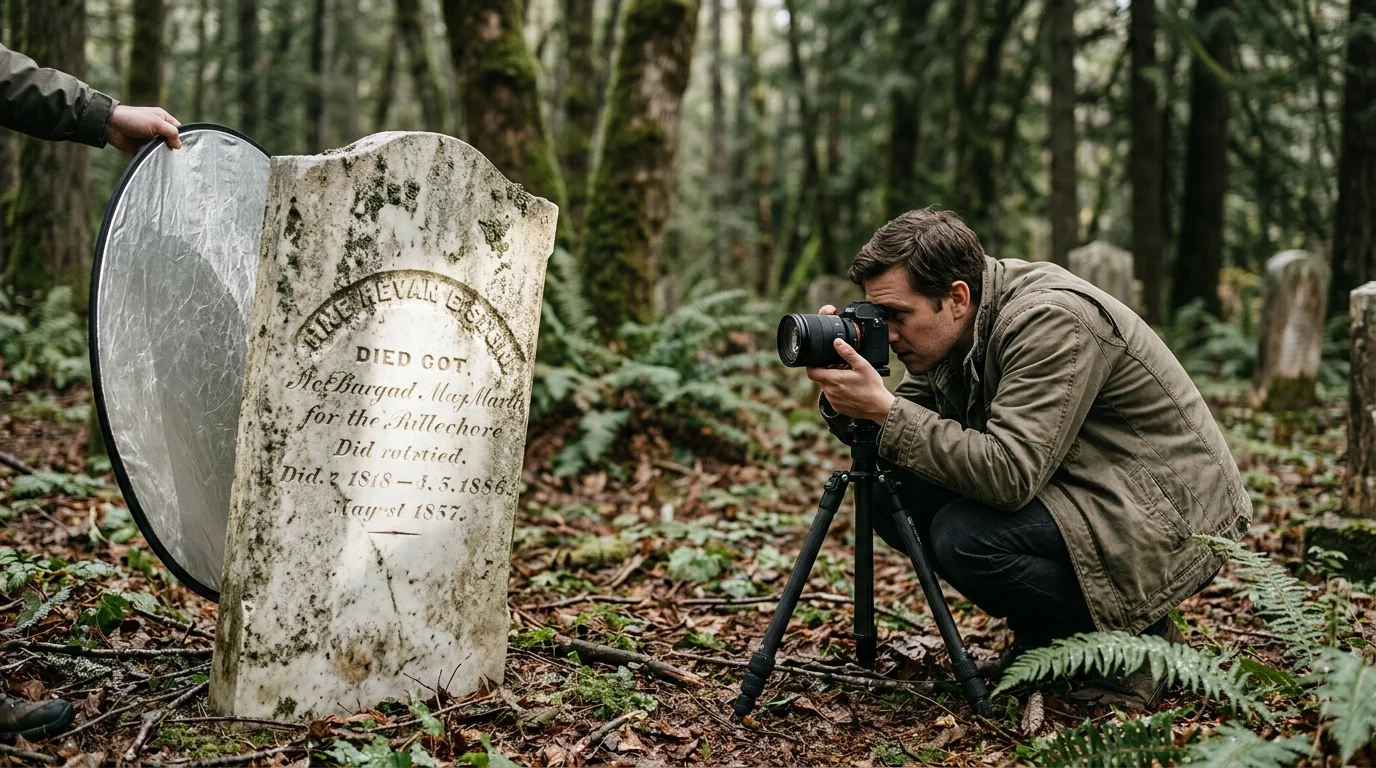
Instead, directing natural ambient light with a hand-held silver reflector at an acute 15-degree angle casts sharp micro-shadows into shallow grooves, instantly revealing obscured names and birthdates for clean genealogy headstone documentation.
The Physics of Raking Light for Marble Relief
Marble headstones erected between 1780 and 1880 consist primarily of crystalline calcium carbonate. Over decades of exposure to acid precipitation, the mineral binder dissolves, creating a granular surface condition known as sugaring.
When rain washes away loose calcite crystals, hand-carved epitaphs lose their sharp V-profile. Incision depths often dwindle from three millimeters down to less than 0.5 millimeters.
In dense woodland cemeteries, overhead leaf canopies scatter sunlight into a uniform, diffuse dome. This omnidirectional ambient light fills shallow lettering evenly, eliminating natural shadows and rendering the carvings invisible to camera sensors.
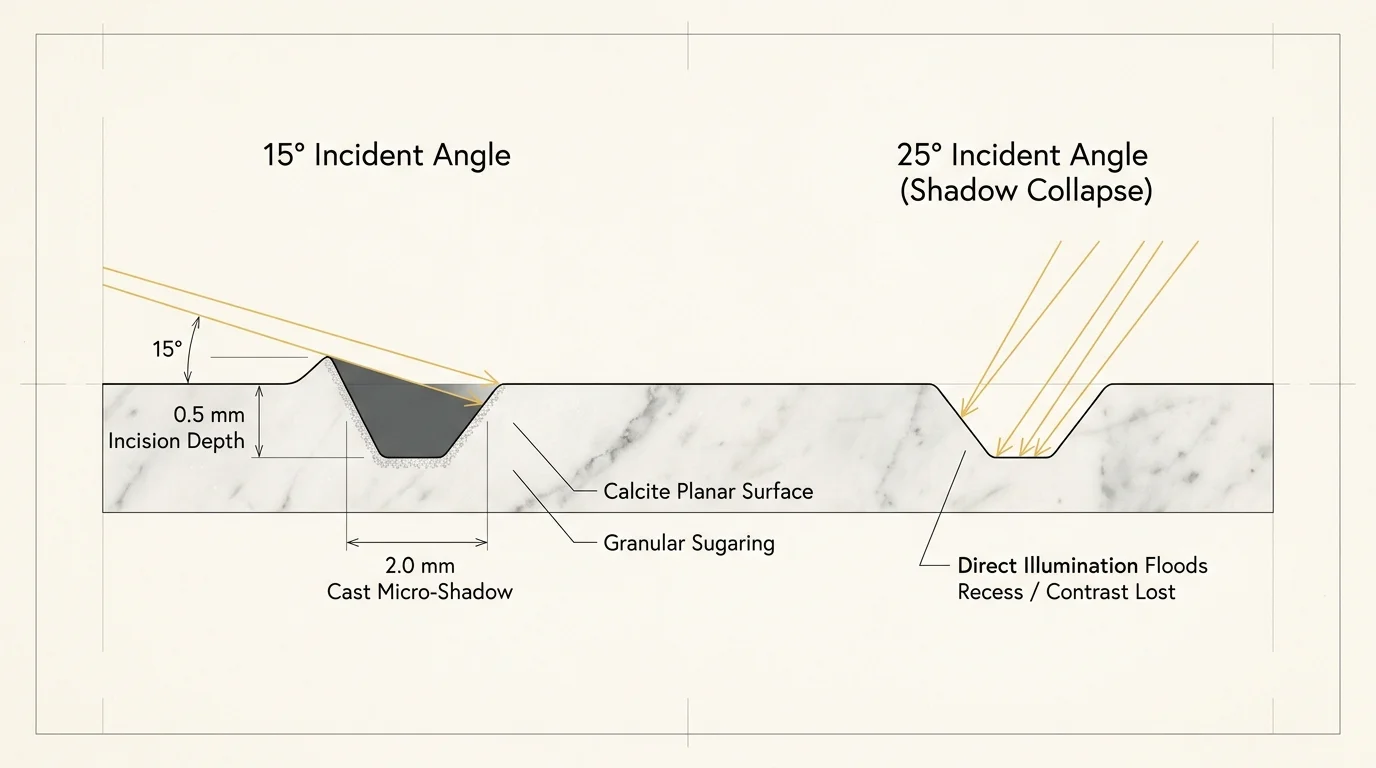
Raking light solves this optical dilemma by introducing severe directional contrast. When you project a collimated beam across the stone face at a grazing angle, the light illuminates the top planar surface while skimming completely over low recesses.
The edge of each carved groove blocks the grazing rays, casting a dark, well-defined micro-shadow across the bottom of the incision. This shadow creates high optical contrast between the white calcite face and the shaded lettering.
The incident angle dictates the exact length of the resulting shadow. At an angle of 15 degrees, a 0.5-millimeter incision edge casts a shadow nearly two millimeters long, quadrupling the visual footprint of the carving.
Moving the light source beyond 25 degrees floods the incision floor with illumination. Once light strikes the base of the letter, edge shadows vanish and the carving disappears into the pale background stone.
According to conservation protocols established by the American Institute for Conservation, photographic raking light provides superior legibility without altering the stone substrate. Optical documentation preserves delicate historic markers that physical friction would otherwise destroy.
The Hidden Dangers of Rubbings and Chemical Fillers
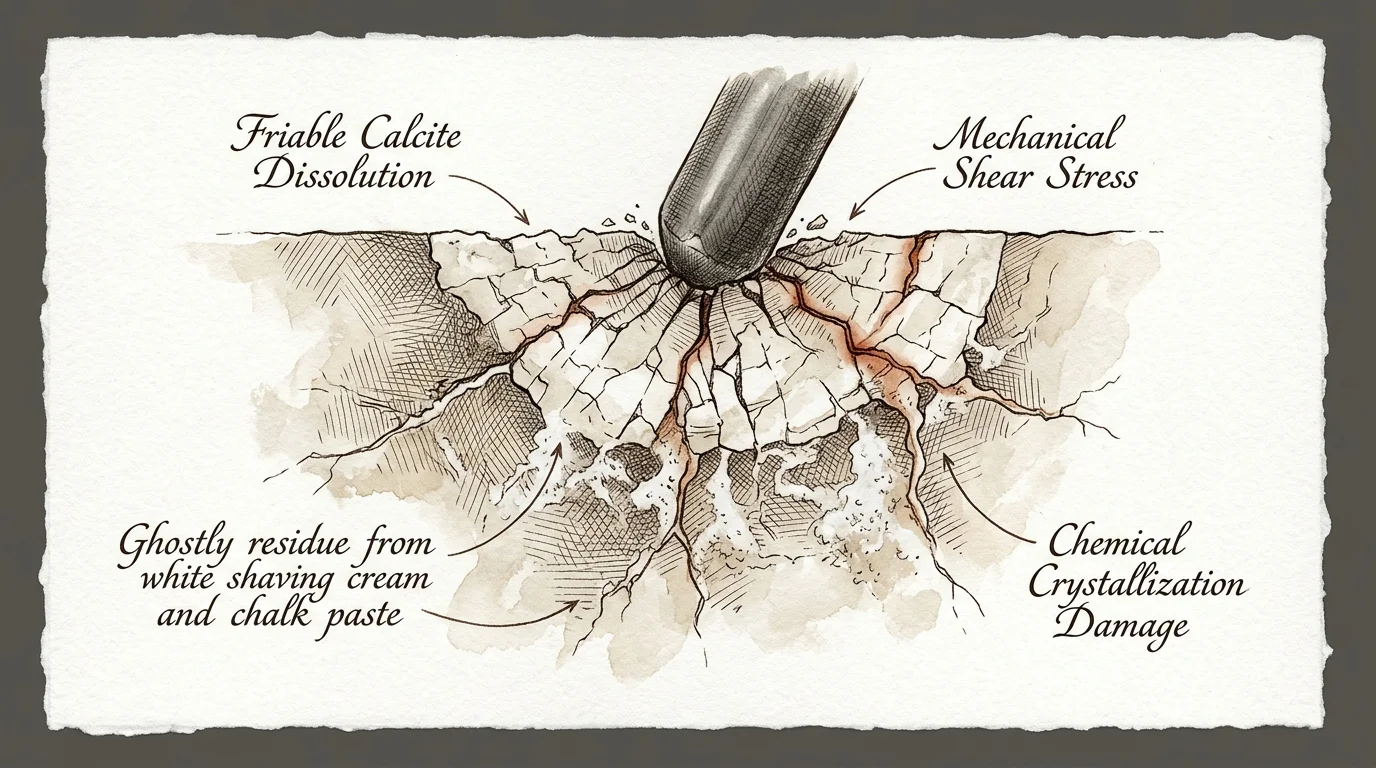
Many family historians grew up using paper and graphite crayons to capture tombstone inscriptions. However, applying mechanical pressure against friable marble dislodges thousands of microscopic calcite crystals during every rubbing session.
Severe mechanical shear can easily snap thin, weathered headstones at the ground line. Furthermore, wax crayons frequently bleed through light paper, leaving permanent, insoluble residues that attract atmospheric grime and promote lichen growth.
Physical contact with weathered grave markers inevitably dislodges friable mineral grains; optical documentation remains the only completely safe recording method for historic stone.
Chemical shortcuts inflict even faster destruction on historic cemetery markers. Shaving cream contains stearic acid, emulsifiers, and synthetic fragrances that penetrate porous marble pores and accelerate structural dissolution from within.
Garden flours, chalk sticks, and talcum powders also lodge inside weathered stone cavities. These organic substances trap atmospheric moisture and feed destructive micro-flora colonies, causing deep spalling within months of application.
Furthermore, many municipal and historic cemeteries explicitly prohibit gravestone rubbings under local preservation ordinances. Genealogists caught applying chalk or wax markers can face trespassing citations and substantial fines for defacing historic monuments.
Photographing eroded gravestones using purely optical methods eliminates all legal liability and conservation risk. You never make physical contact with the fragile monument, ensuring the historic artifact remains intact for future generations.
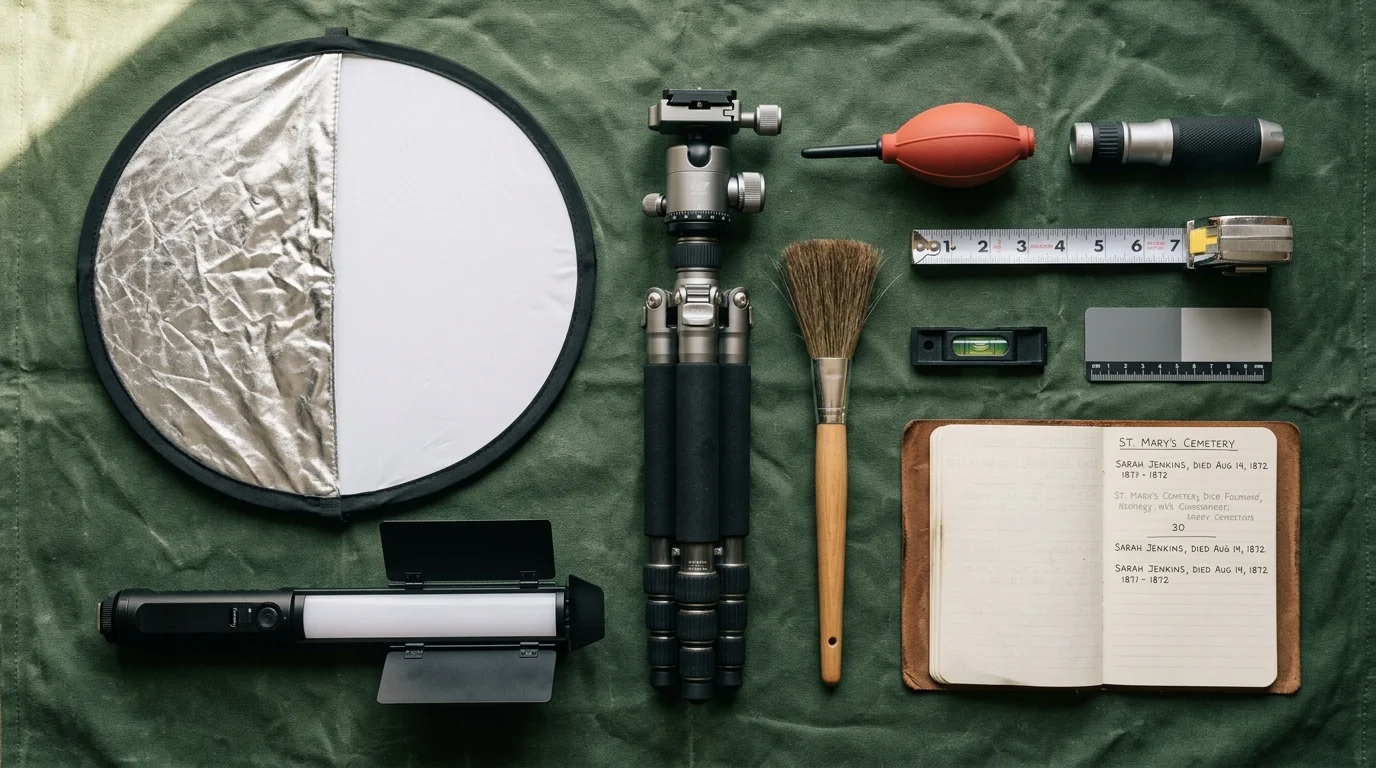
Essential Field Kit for Low-Light Canopy Photography
You do not need heavy cinema gear to produce professional raking light headstone photos in remote churchyards. A lightweight, targeted kit fits easily inside a daypack and operates reliably without household electrical power.
The core tool is a 42-inch 5-in-1 collapsible circular reflector featuring a textured silver surface. Silver fabric produces crisp, specular highlights that project sharp shadows across weathered stone, whereas softer white fabric scatters light too broadly.
Mount your camera on a sturdy carbon-fiber travel tripod equipped with a three-way gear head or precision ball head. Long exposure times in deep forest shade require rigid camera stabilization to avoid micro-motion blur.
Select a standard 50mm prime lens or a 24-70mm zoom lens set to 50mm. Normal focal lengths capture gravestones with zero optical barrel distortion, ensuring epitaph proportions remain architecturally accurate for archival records.
A small carpenter’s bubble level mounted on your camera hot shoe ensures exact vertical and horizontal alignment. Keeping the camera sensor plumb with the gravestone face prevents trapezoidal perspective distortion in your final genealogical archive.
Carry a compact clamp, such as a multi-purpose reflector clip mounted on a lightweight 6-foot aluminum stand. This hardware allows you to position and secure the reflector hands-free while adjusting your camera settings.
Add a high-output, battery-powered LED video light panel providing at least 1,000 lumens with a high color rendering index. This supplementary continuous light source provides essential illumination when tree canopies block all usable sky light.
Pack a smartphone loaded with an astronomical positioning app like Sun Surveyor or PhotoPills. These tools let you preview sun angles through tree cover hours in advance, allowing you to intercept brief canopy clearings.
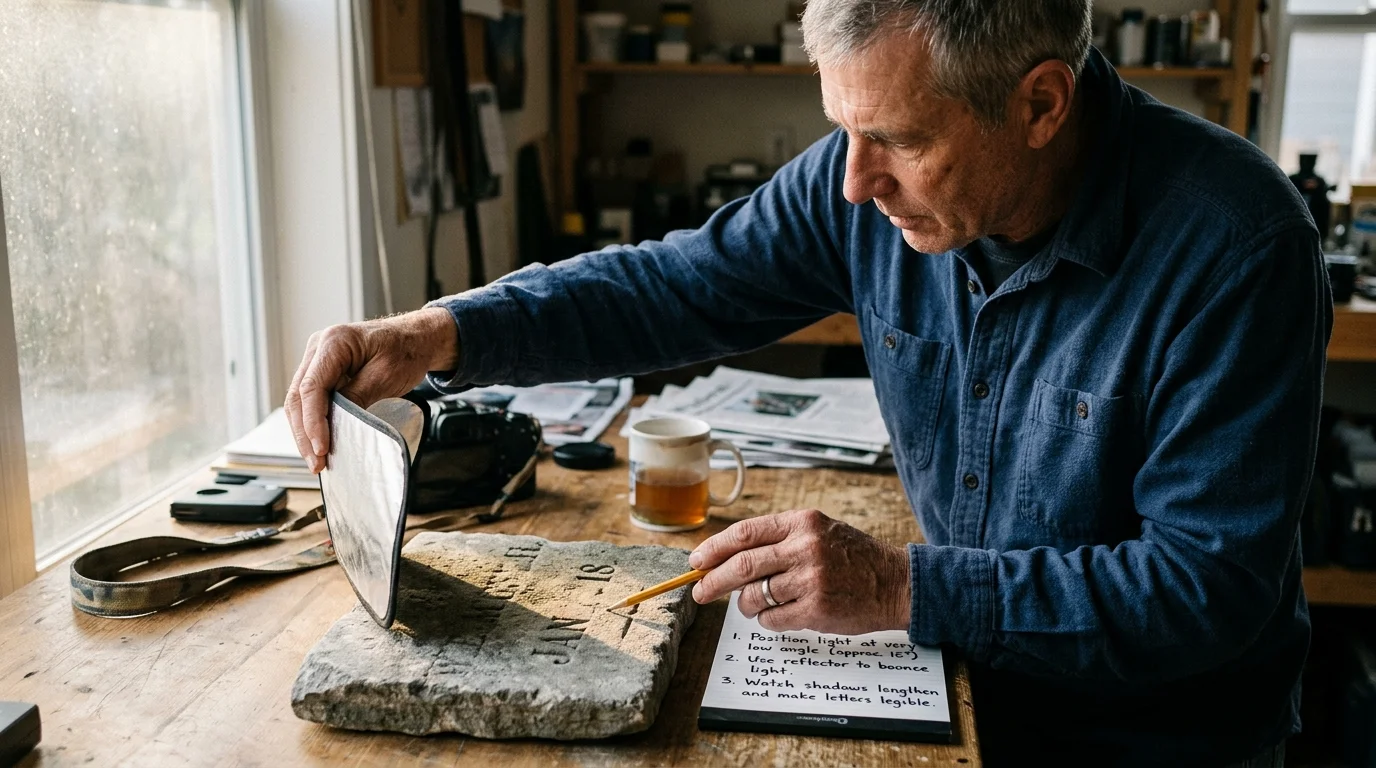
Step-by-Step Guide to the 15-Degree Reflector Technique
Successful raking light photography requires deliberate geometric alignment between the camera, the stone surface, and your secondary light bounce. Follow this systematic field sequence to recover obscured epitaphs reliably.
Position your tripod directly in front of the headstone, aligning the camera sensor strictly parallel to the stone face. Keeping the lens axis perpendicular eliminates perspective keystoning and maintains uniform focus across the entire inscription.
Identify the brightest opening in the overhead canopy, whether it is a break in hemlock branches or clear sky above an adjacent path. You will catch this natural light down-beam on your reflector surface.
Unfold the 42-inch silver reflector and hold it alongside the stone face. Position the reflector edge roughly six inches forward of the carved plane, angling the surface inward at approximately 15 degrees.
Sweep the reflected beam slowly across the stone face from the left side. An acute 15-degree strike angle casts sharp shadows across vertical strokes, such as the stems of letters like B, D, and H.
If horizontal strokes remain faint, tilt the reflector slightly downward or switch to an oblique top-corner angle. Rotating the reflector slightly changes shadow direction, exposing horizontal crossbars on letters like E, F, and T.
When dealing with deeply eroded script, employ two reflectors simultaneously to create balanced cross-lighting. Position the primary silver reflector at 15 degrees on the left and a smaller white reflector at 45 degrees on the right.
This cross-lighting fills overly harsh black shadows with soft detail while preserving the critical dark edges that outline degraded letter forms. It proves especially useful for intricate Victorian cursive epitaphs and flourishing calligraphy.
Switch your camera to manual exposure mode and set your base sensitivity to ISO 100 or 200. Choose an aperture of f/8 to ensure edge-to-edge depth of field across the entire tablet.
Adjust your shutter speed until the histogram shows no clipped highlights on the sunlit stone face. Use a two-second self-timer or wireless remote shutter release to eliminate camera shake during the exposure.
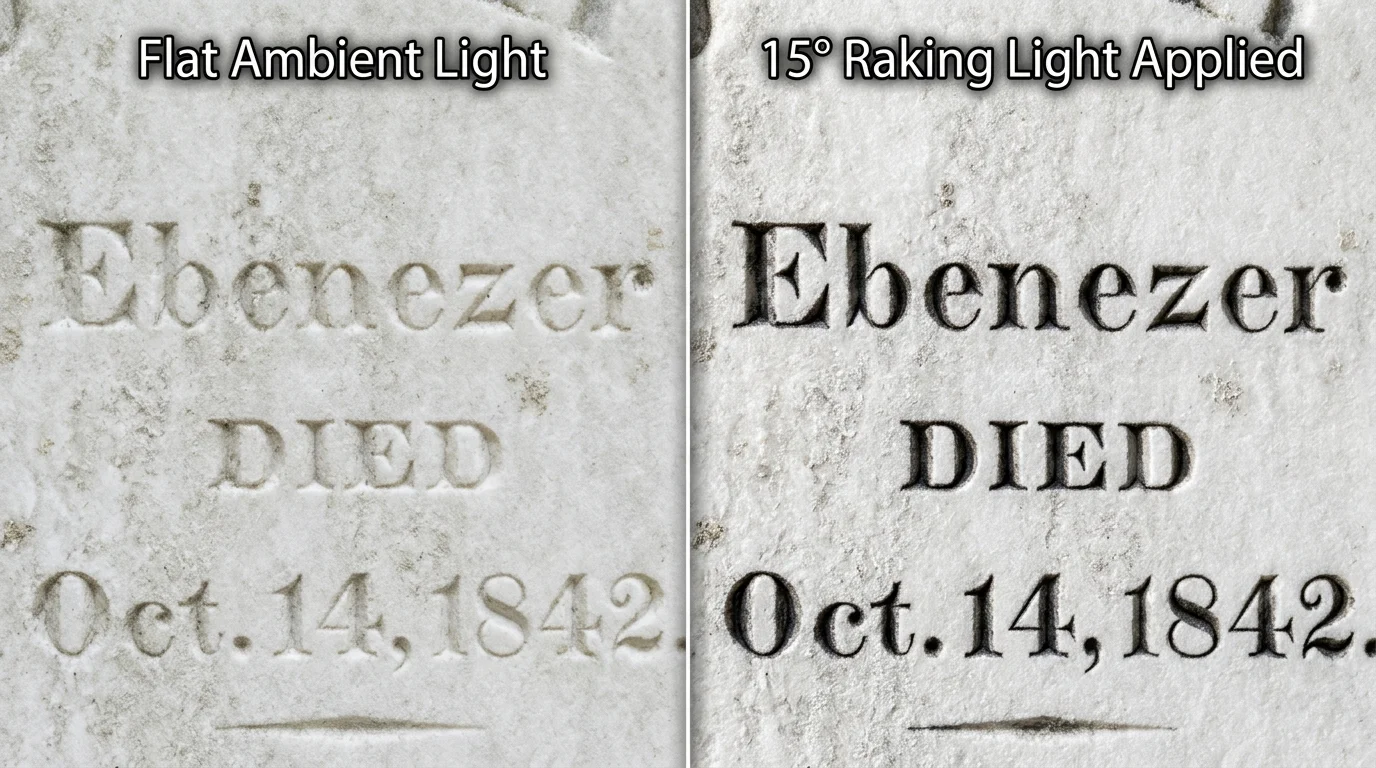
Worked Example: Deciphering an 1842 Woodland Headstone
Consider a typical field scenario involving an illegible marble headstone standing in an abandoned, heavily wooded family burial ground in central Massachusetts. The monument marks the burial place of Eunice Bradley, who died in 1842.
Overhead hemlocks and mountain laurel bushes block direct sunlight, casting the cemetery into deep shade with an ambient light reading of EV 7. The 34-inch tall marble slab displays severe granular weathering.
To the unaided eye, the weathered center inscription looks like completely smooth, blank gray stone. Decades of acid exposure have reduced the carved lettering to a shallow depth of roughly 0.6 millimeters.
The researcher mounted a mirrorless camera with a 50mm prime lens on a tripod 4.5 feet away, leveling the sensor precisely to the tablet. An initial ambient test shot at f/8 revealed zero legible text.
The researcher then placed a 42-inch collapsible silver reflector 30 inches to the left of the stone, canted inward at a 15-degree angle toward an overhead sky gap. The bounce redirected 350 lux across the tablet.
Setting the camera to ISO 200, f/8, and a 1/15-second shutter speed captured deep, sharp shadows within every shallow groove. The resulting image immediately revealed the previously invisible inscription: “In Memory of Eunice, wife of Lyman Bradley.”
Below the name, the raking light clearly exposed the lower lines: “Died Oct. 14, 1842, Aged 71 Y’rs.” The entire optical setup took less than four minutes and caused zero physical abrasion to the fragile marker.
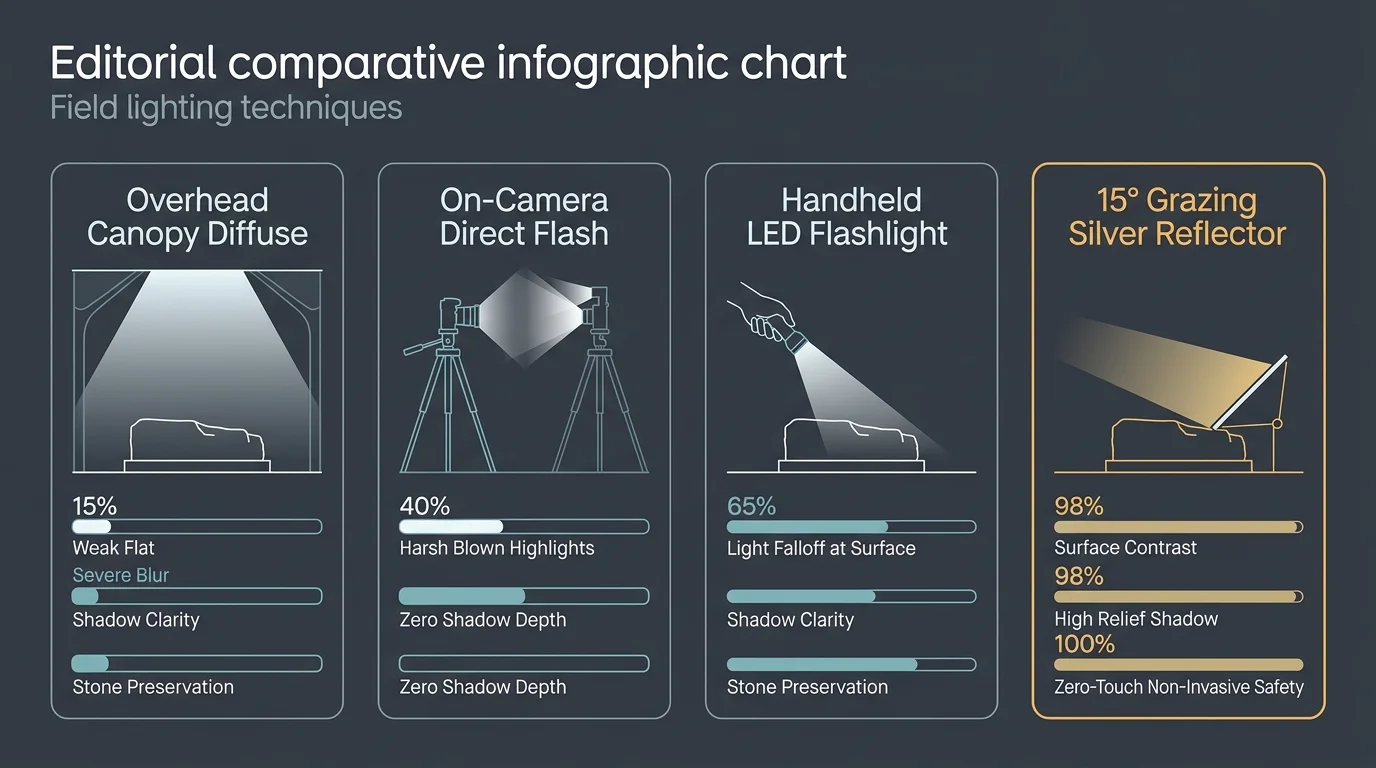
Comparing Field Lighting Methods for Gravestones
Choosing the right photographic approach depends on canopy density, cemetery regulations, and equipment weight. Comparing field methods across standardized metrics helps you plan efficient, non-destructive excursions.
| Documentation Method | Physical Contact Risk | Deployment Time (Min) | Pack Weight (lbs) | Contrast Gain (EV Delta) |
|---|---|---|---|---|
| 42-Inch Silver Reflector (15-Degree Rake) | Zero contact / 0 mm | 2 – 4 minutes | 1.8 lbs | +2.5 to +3.5 EV |
| Continuous Bi-Color LED Panel (1,200 Lumen) | Zero contact / 0 mm | 3 – 5 minutes | 2.4 lbs | +2.0 to +3.0 EV |
| Off-Camera Flash with Wireless Trigger | Zero contact / 0 mm | 6 – 10 minutes | 4.2 lbs | +3.5 to +4.5 EV |
| On-Camera Direct Pop-Up Flash | Zero contact / 0 mm | 1 minute | 0.0 lbs (built-in) | -0.5 EV (washes out shadows) |
| Graphite Crayon & Rice Paper Rubbing | Severe abrasion / Friction wear | 15 – 25 minutes | 1.2 lbs | N/A (Destructive print) |
As the metrics show, hand-held silver reflectors deliver an optimal balance between low pack weight, fast deployment, and high contrast gain. They generate natural shadow gradients without requiring rechargeable battery packs in remote locations.
Continuous LED panels offer an excellent secondary alternative when photographing deeply enclosed hollows where overhead foliage eliminates ambient sunlight. However, battery consumption limits field operating time during long survey expeditions.
Off-camera flash units provide exceptional contrast control, but balancing strobe output against deep shade requires complex wireless transmitters and test exposures. Direct on-camera flash remains completely counterproductive because flat front lighting fills incisions and erases shadows.

Post-Processing Workflow for Maximum Text Clarity
Even optimal raking light headstone photos benefit from targeted digital enhancement. Processing raw photographic files allows you to maximize textual legibility without falsifying historical evidence.
Begin by converting the image to monochrome. Stripping away distracting green moss streaks, yellow lichen patches, and mineral staining lets your eye focus exclusively on carved relief edges.
Adjust local contrast rather than global contrast. As detailed in the photographic tutorials at Cambridge in Colour, boosting midtone micro-contrast amplifies fine structural details without blowing out specular highlights or blocking deep shadows.
In your raw processing software, increase the Texture and Clarity sliders moderately, keeping values between plus 20 and plus 35. These adjustments emphasize the transition boundaries between the illuminated stone face and carved letter valleys.
Next, inspect your tonal histogram and apply a subtle S-curve adjustment. Pull down dark midtones slightly to deepen the letter micro-shadows while pinning highlights to preserve authentic surface grain.
Always embed standard IPTC metadata directly into your TIFF and JPEG files before archiving. Record the deceased individual’s full name, birth and death dates, cemetery coordinates, and cemetery plot numbers inside the file header.
This standardized cataloging ensures your cemetery headstone photography tips translate into durable family records. Genealogical databases like Ancestry and FamilySearch index this embedded metadata automatically, making your photographic discoveries easily searchable for future researchers.
Finally, zoom into the image at 100 percent view to transcribe obscure numbers, such as distinguishing an eroded 3 from an 8. Export the master file in uncompressed TIFF format for archival genealogical storage.
Frequently Asked Questions
How do I read a headstone when direct sunlight hits the face?
Direct sunlight striking a stone face-on causes harsh glare that washes out shallow relief carvings. Use a 42-inch collapsible diffuser panel or an umbrella to block direct sun, then bounce raking light from the side.
Why is silver better than white or gold for headstone reflectors?
Silver fabric provides specular, directional bounce that maintains tight beam coherence over several feet. White fabric diffuses light too softly to cast crisp shadows, while gold fabric casts an unnatural warm cast over white marble.
Is it ever acceptable to clean a weathered headstone with water before photographing?
You may spray clean, potable water using a low-pressure pump sprayer if local cemetery regulations permit. However, wetting marble can reduce optical contrast by darkening the carved valleys to match the surface, so photograph dry stone first.
What camera settings work best for raking light photos in dense woods?
Mount your camera on a sturdy tripod, select ISO 100 or 200, and set your aperture to f/8 for sharp corner-to-corner clarity. Allow your shutter speed to drop as needed, using a shutter timer to prevent camera shake.
Can smartphone cameras capture effective raking light headstone photos?
Modern smartphones capture excellent raking light images if you lock focus and exposure manually. Tap and hold the stone face on your phone screen to lock exposure, then drag down the brightness slider to deepen letter shadows.
Disclaimer: This article is for informational purposes only. When handling valuable or irreplaceable photographs, consider consulting a professional conservator. Always test preservation methods on non-valuable items first.